Monday 27 October 2014

Practicing Techniques for my Image 1 Design


Before choosing my design for image 1, I decided to practice the wax application, and cutting into it on the back of my hand. I started by smoothing the wax down, before cutting into it with a spatula. Then I set it with liquid latex as I have no sealer at home, before applying foundation over it to blend it in. I think this look worked quite well. The liquid latex was a little difficult as it settles into the cuts and seals them a little, but as sealer is thinner I don't think this should be too much of an issue. The foundation was a little sheer also, so I may want to consider using a high coverage foundation or concealer instead when creating the design. The latex started peeling up as it was on the back of my hand, so this is something I need to consider when thinking about size and placement, as if the placement is near expression lines of some sort it could distort the design.

Practising my Design
After practising on the back of my hand, I had a go at applying the wax in the shape I wanted on my cheekbone.

I found it quite difficult to smooth this out on myself, and the area was a little large so it went onto the under eye skin which wasnt so easy to smooth the wax into, so I will make the shape smaller and more confined to the cheekbone.
 I then cut my design into the wax. I like how this design turned out and feel that it is simple enough to carry out in the time we have, yet effective. I didn't want to create too much and create too busy a look.

Next I covered the area with foundation. Again the foundation I used here wasn't the best, and I found it difficult to seal and colour in the cuts as I couldn't quite see the area on the mirror, but with sealer and a smaller brush and better view I don't think I will have too much of a problem applying this look in the lesson.

For this look I used:
  • Ben Nye nose & scar wax
  • Liquid Latex
  • Illamasqua translucent powder
  • Revlon Photoready Foundation
  • Spatula

Sunday 26 October 2014

Bald Caps

Health and Safety
  • Ask model to close eyes when applying bald cap and using spirit gum/spirit gum remover.
  • Be very careful when cutting the bald cap to fit- hold away from skin with fingers but don't pull the bald cap and stretch it out
  • With spirit gum avoid sensitive areas
  • If any irritation occurs remove immediately
  • Use in a ventilated area as spirit gum and spirit gum remover have strong smells
Remember:
  • When working, if a model decides to shave their head instead of wearing a bald cap, the head has to shaved every day to prevent a 'shadow' from regrowth.
  • Apply all make-up after applying the baldcap
  • Ensure the forehead is completely grease-free before applying bald cap- end on toning (don't apply moisturiser)
  • You can't use hair pins to secure the hair- use lots of gel
  • You can use soap around the hairline to smooth down flyaway hairs
  • If the model has really long hair, talk to the directors and lighting directors about shooting from certain angles to mask any visible hair.
You will need:
  • Spirit gum
  • Spirit gum remover
  • Brown eye pencil
  • Bald cap
  • Towel
  • Water
  • Hair gel
  • Pintail comb
  • Scissors
Application
Start by brushing the hair through away from the head, ensuring it is well brushed and there are no knots. Next, wet the hair completely through and apply lots of gel from root to tip. Wet and add more gel, ensure all hair is completely coated, and is as wet and flat as possible.
Wrap the hair around the head, keeping it flat as possible. If the model has long hair, it may be easier to split it in half down the middle and wrap each half separately. Add gel as you go.
When the hair is all flat to the head, ask the model to do "Bunny ears" and hold the bald cap square at the front of the head. Pull the cap right down, securely onto the head. Ensure the model has their eyes closed.
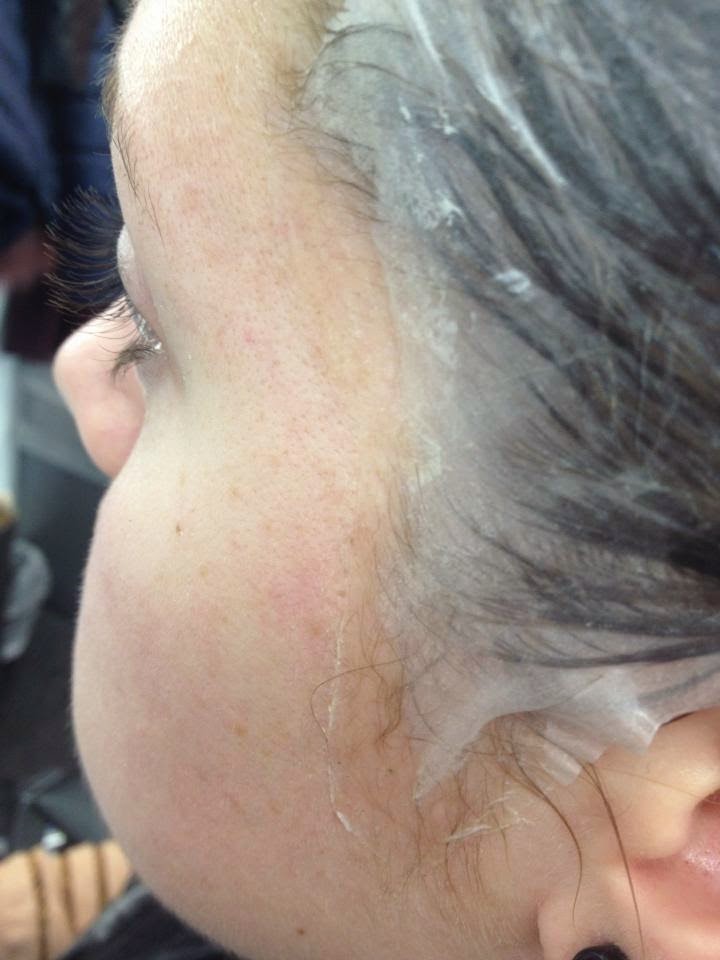
Using your brown eye pencil, mark where to cut the ears. Remember you can always cut more off. Cut the ears and the front of the bald cap if required, remembering to pull away from the face with your fingers, but not stretching the cap. Roll the front of the cap back, ensure there are no hairs peeping out. if there are, gently tuck them back using the pintail comb. Apply spirit gum to the cap and quickly stick the cap down onto the forehead. Smooth down flat using a damp puff and a rolling motion. Once the front is secured, you can then work around the head. Ensure the model is looking down when you stick the back, this will reduce any baggyness and wrinkles.

Colouring
For natural skin colours, you must use colour correctors (pink, red, yellow, orange) to counteract the hair colours. Then apply the foundation over this, ensuring you match the foundation to the face and not to the bald cap, then set with powder. For a freckled effect, use supracolour mixes with isopropyl alcohol and flick it on the head, ensuring the model has their eyes closed.
Can paint with supracolours, aquacolours, coloured hair sprays. can add liquid latex etc.
I unfortunately didn't have the chance to practice this in the lesson as my partner had extensions in, and we ran out of bald caps.


 I think bald caps are really interesting and striking tools to use. I think it's really interesting how much they can change the look of the face and add an alien look if it is coloured correctly. The bald cap also opens opportunities for adding liquid latex and wax over the hair.


Contemporary Examples of Bald Caps
unknown, (unknown date), Hair [ONLINE]. Available at: http://media-cache-ak0.pinimg.com/originals/96/f1/ba/96f1bacfc02f849fb4e5e0568eb051eb.jpg [Accessed 26 October 14].
unknown, (1803), Bald cap, painted with latex and glitter, jewels [ONLINE]. Available at: http://media-cache-ec0.pinimg.com/736x/4d/7f/df/4d7fdfa9c9580cf1a0db9c290c09f882.jpg [Accessed 26 October 14].


Berczel, L, (2013), Gray's Anatomy [ONLINE]. Available at: http://th00.deviantart.net/fs71/PRE/i/2013/042/e/d/imats_13___gray_s_anatomy_by_battledress-d5uo1lt.jpg [Accessed 26 October 14].
Yatkivskaya, E, (2012), Snake I [ONLINE]. Available at: https://500px.com/photo/21942391/snake-i-by-stanislav-istratov [Accessed 26 October 14].

I really like these contemporary uses of bald caps, and think they all have really great effects. There are more on my pinterest board which can be seen here.

Contemporary Scarification


Ryan Quelette at Precision Body Arts, (2013), Scarification [ONLINE]. Available at: http://www.precisionbodyarts.com/#!scarification/cqo3 [Accessed 26 October 14].
Scarification is a growing form of body modification in the western culture, especially in the gothic subculture. I definitely think that this trend has been influenced by tribal scarification, and a new twist has simply been put on it such as the intricacy of the designs and the way it is applied and healed. I think the effects of this scarification are beautiful and I really like the way the designs look when they are fresh, but I wouldn't personally get one as the aftercare would be difficult and no one can tell how the scar will heal, and I also think this is why scarification like this won't become a norm in our culture, at least any time soon.

Contemporary Examples of Tribal Modification

Russell, AP, (2005), !!!!! [ONLINE]. Available at: http://www.arianapagerussell.com/files/gimgs/8_5530.jpg [Accessed 26 October 14].
This image was taken of and by Ariana Page Russel who has hypersensitive skin which she can create designs on by lightly scratching. These designs often look like scarring, but only last around 30 minutes.

Parbs, T, (2008), Bake [ONLINE]. Available at: http://klimt02.net/common/media.php?Id=13994&Hash=73b2f4d040b97893f9518258f2650463&Type=Image [Accessed 26 October 14].
Tiffany Parbs' 'Mark' series looks at the surface of the body, and how you can leave marks and imprints in the skin. This particular image features sunburn. This sunburn would be more permanent than impressions in the skin, but still not as permanent as scarring.

Mandrescu, A, (2011), Inlaid Skin [ONLINE]. Available at: http://www.andreeamandrescu.com/#/inlaid-skin/3847721 [Accessed 26 October 14].
Andreea Mandrescu uses 'inlaid pieces' which have been cut, designed and attached to the body to look like a sort of second skin. These pieces are really interesting to look at and create a striking look as at first glance it does look like the model has a strange skin texture.

Vincini, L, (2013), Lucie Vincini Catwalk [ONLINE]. Available at: http://silhouettetrends.files.wordpress.com/2014/02/lucie-vincini-lip-plate-africa-trend_.jpg?w=600 [Accessed 26 October 14].
Designer Lucie Vincini looked at lip plates for her catwalk designs, giving an eye catching look to the face. This is definitely not an every day accessory in western culture, but the lip plates, like those seen on the right, are the norm in many tribes.

Upton, S, (2010), Samantha Harris [ONLINE]. Available at: https://blogger.googleusercontent.com/img/b/R29vZ2xl/AVvXsEjrYJ4rnwrHJV4i_Sh8IxQmy8L73G02usfM8dL_sb99E7QJslHafcdvsnb_zicz3VXQSIzv8hiyYAisDmI3CJBqouLpYf5mHwbr5Blg-OnUyCk6PswwIutfxoIC9beISjBGiEFzHI9hJmc/s320/sam+harris.JPG [Accessed 26 October 14].
This shoot from Harpers Bazaar of Samantha Harris features neck rings. Samantha Harris is considered Australia's first aboriginal supermodel, and this may have been why this shoot featured lots of African influences such as the neck rings and jewellery.

Dior, (2011), J'adore Dior Ad [ONLINE]. Available at: http://thebeautysmith.com/wp-content/uploads/2011/08/CharlizeTheron.jpg [Accessed 26 October 14].
Dior has featured a contemporary style of neck rings in their J'adore perfume advertisements. This doesn't bring the idea of neck rings to mind at first glance, but the influence is very obvious. I think they have used this design as it really helps create elegance and class.

Hartley, P, (2014), Face Corset [ONLINE]. Available at: http://static.squarespace.com/static/50d73df3e4b00220dc6c1b07/50d7af88e4b0a057029fb21b/50d876d0e4b00220dc6e0ac5/1356363499679/3.%20incisivus%20labii.jpg?format=500w [Accessed 26 October 14].
Paddy Hartley experimented with facial binding or corsetting and looking at how it changed the appearence of the face. I think this is a really simple but effective way of altering the face shape, and I would like to experiment with this myself, with maybe elastic bands or string.


Image 1 Design Ideas

Design 1

This is my first design for the anthropological low tech prosthetics image. It is quite simple, using wax on the cheekbones to accentuate them and then cutting into it to create the look of scars or impressions on the skin. I was inspired mainly by scars for this design: specifically fresh scars in a more contemporary style. I considered filling the cuts in with red to make it look like the blood of a fresh scar, but instead wanted to leave the cuts flesh toned to make it look like this was always part of the models face.
Unknown, (2013), Scarification [ONLINE]. Available at: http://www.cvltnation.com/extreme-body-modifications/ [Accessed 26 October 14].

Unknown, (unknown date), Scarification [ONLINE]. Available at: http://media-cache-ec0.pinimg.com/736x/16/17/21/161721c8b8cb70df27d3423034bce686.jpg [Accessed 26 October 14].
Design 2
 For my second design I intended to use a bald cap, and then attach string or hair from extensions over the bald cap, before blending it into skin colour.
unknown, (unknown date), Hair [ONLINE]. Available at: http://media-cache-ak0.pinimg.com/originals/96/f1/ba/96f1bacfc02f849fb4e5e0568eb051eb.jpg [Accessed 26 October 14].
The image above really inspired me for this design. I really like the snake like texture of the hair, but I think that one of the things that makes this image and design work is the lighting and colouring, so the design may not translate too well in a skin colour, as it would probably lose some of its mysterious, snake like charm.

Design 3
 This design features three wax 'horns' on the forehead, and a pattern of scars on the cheeks created using tuplast. for this image I was inspired by various images of subdermal implants, particularly those on the forehead. but I wanted to bring the design further and onto the face by creating the pattern of scars on the cheeks. I chose to do these in a pattern as in tribal cultures the scars are often in geometric patterns.
Miss xRonix, (2013), I won't say anything [ONLINE]. Available at: https://blogger.googleusercontent.com/img/b/R29vZ2xl/AVvXsEhI4zv6WXEE2LzkUpPtKVqtxr0_9u9eZ4e8pUt5TK0gOrrWOuFk95Vxj3qdlcZmSxNeUMqUniUw_ANp3CxKor_T_PFjkOcIgIAkB8D1mqImsh1aRvpsCFF97rGQEqL8XrNSENwkxoFfoeE/s320/IMAG2096.jpg [Accessed 18 November 14].

unknown, (unknown date), Woman with Horns [ONLINE]. Available at: http://www.oddee.com/_media/imgs/articles2/a97551_g220_9-horns-woman2.jpg [Accessed 18 November 14].

Friday 24 October 2014

Brave New World Moodboard

Since starting the project, I have been adding images to a pinterest board to help me find inspiration. My pinterest board can be found here.

Here is a more specific moodboard of the Brave New World project.